> For the complete documentation index, see [llms.txt](https://hyperdust-foundation.gitbook.io/docs-and-guides/llms.txt). Markdown versions of documentation pages are available by appending `.md` to page URLs; this page is available as [Markdown](https://hyperdust-foundation.gitbook.io/docs-and-guides/run-a-hyperagi-node/2.installing-required-software-for-the-node.md).

# 2.Installing Required Software for the Node

#### 2.1 Download the Node Installation Package <a href="#id-2.1-download-the-node-installation-package" id="id-2.1-download-the-node-installation-package"></a>

Please stay tuned!​Please install step by step, choosing 'Next' by default (except for the virtual sound card)：

It is recommended to use 7zip software for extraction; download the 64-bit Windows x64 version. And rename the extracted folder to 'miner'.

<figure><img src="https://files.gitbook.com/v0/b/gitbook-x-prod.appspot.com/o/spaces%2F9CJd26QKcdOFwMDIr6IB%2Fuploads%2FvluuDkYpK7pBL2AHZFI4%2F2.1-1.png?alt=media&#x26;token=05009526-d916-419b-8dda-2cb696951621" alt=""><figcaption></figcaption></figure>

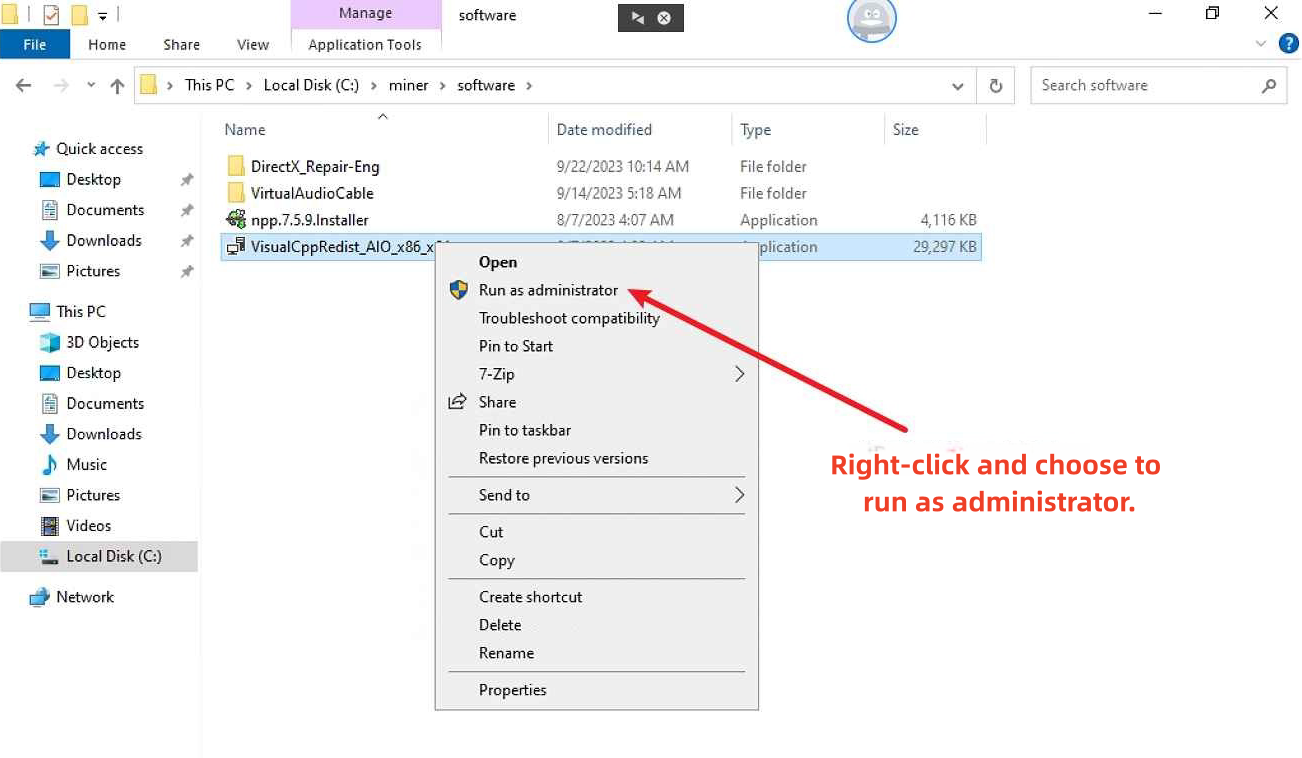
#### 2.2 Install VC Runtime Library <a href="#id-2.2-install-vc-runtime-library" id="id-2.2-install-vc-runtime-library"></a>

VC Runtime Library(miner\software\VisualCppRedist\_AIO\_x86\_x64.exe)

<figure><img src="https://files.gitbook.com/v0/b/gitbook-x-prod.appspot.com/o/spaces%2F9CJd26QKcdOFwMDIr6IB%2Fuploads%2FuwTUvcby6J4ZEvaWYE7y%2F2-2.png?alt=media&#x26;token=dcf85d63-055c-4aa0-b98d-002e4db0b2ab" alt=""><figcaption></figcaption></figure>

#### 2.3 Install DX Runtime <a href="#id-2.3-install-dx-runtime" id="id-2.3-install-dx-runtime"></a>

After installation, it is necessary to detect and repair any issues.Launch'miner\software\DirectX\_Repair-Eng\DirectX Repair.exe'.​

<figure><img src="https://2850557763-files.gitbook.io/~/files/v0/b/gitbook-x-prod.appspot.com/o/spaces%2F8zqrLhURHxtqyfjEN6GS%2Fuploads%2FfIvh4yz5xur0OaQ6Siws%2F%E5%BE%AE%E4%BF%A1%E5%9B%BE%E7%89%87_20231122150022.png?alt=media&#x26;token=8afc740b-2b08-40df-9a46-fc1d808ea3a5" alt=""><figcaption></figcaption></figure>

#### 2.4 Text Editor: Notepad++ <a href="#id-2.4-text-editor-notepad" id="id-2.4-text-editor-notepad"></a>

Virtual Audio Card Driver (miner\software\VirtualAudioCable\setup64.exe)

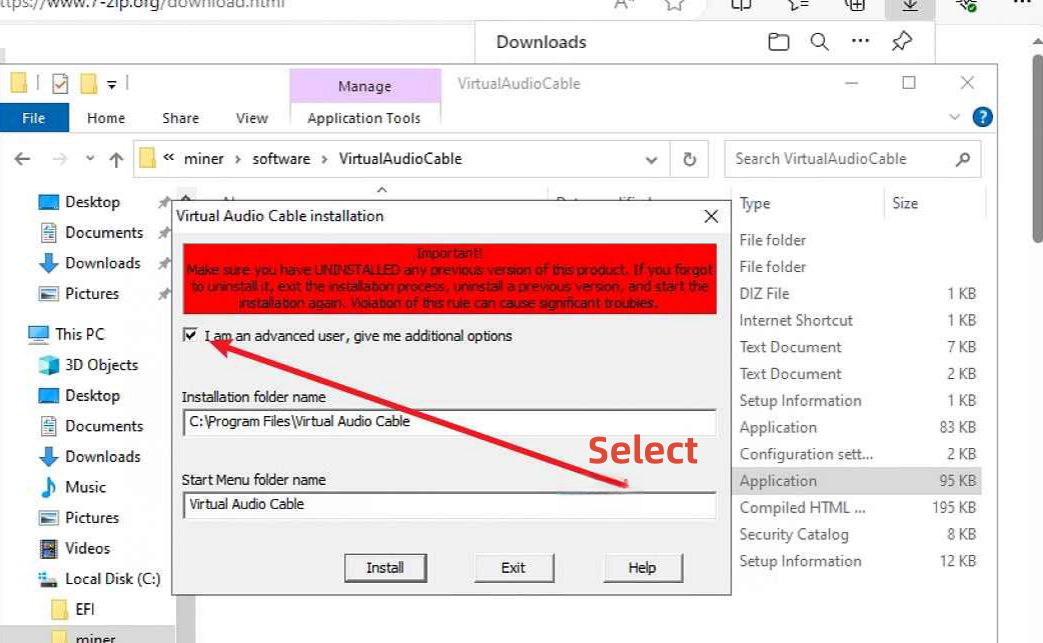
#### 2.5 Install the virtual audio card <a href="#id-2.5-install-the-virtual-audio-card" id="id-2.5-install-the-virtual-audio-card"></a>

The setup64.exe, and click 'Next' until the installation is complete.

<figure><img src="https://2850557763-files.gitbook.io/~/files/v0/b/gitbook-x-prod.appspot.com/o/spaces%2F8zqrLhURHxtqyfjEN6GS%2Fuploads%2FJshfwR8LBdET5sINuk32%2F1.3.png?alt=media&#x26;token=996b0cd5-b564-473a-897b-a729ffdf7f81" alt=""><figcaption></figcaption></figure>

Select: "I am an advanced user, give me additional options."

<figure><img src="https://files.gitbook.com/v0/b/gitbook-x-prod.appspot.com/o/spaces%2F9CJd26QKcdOFwMDIr6IB%2Fuploads%2Fa5Y0VPv2LHw2JLXNdy6L%2F2-5.png?alt=media&#x26;token=f8fb0cce-3855-429f-9c19-f90c4cd1083d" alt=""><figcaption></figcaption></figure>

#### 2.6 Launch the Virtual Audio Card Control Panel (vcctlpan.exe) with administrator privileges <a href="#id-2.6-launch-the-virtual-audio-card-control-panel-vcctlpan.exe-with-administrator-privileges" id="id-2.6-launch-the-virtual-audio-card-control-panel-vcctlpan.exe-with-administrator-privileges"></a>

<figure><img src="https://2850557763-files.gitbook.io/~/files/v0/b/gitbook-x-prod.appspot.com/o/spaces%2F8zqrLhURHxtqyfjEN6GS%2Fuploads%2Fwpd7RJvZCw1uMbmRJW5g%2F1.4.png?alt=media&#x26;token=70344c01-adf7-4082-a794-5998f1a8d864" alt=""><figcaption></figcaption></figure>

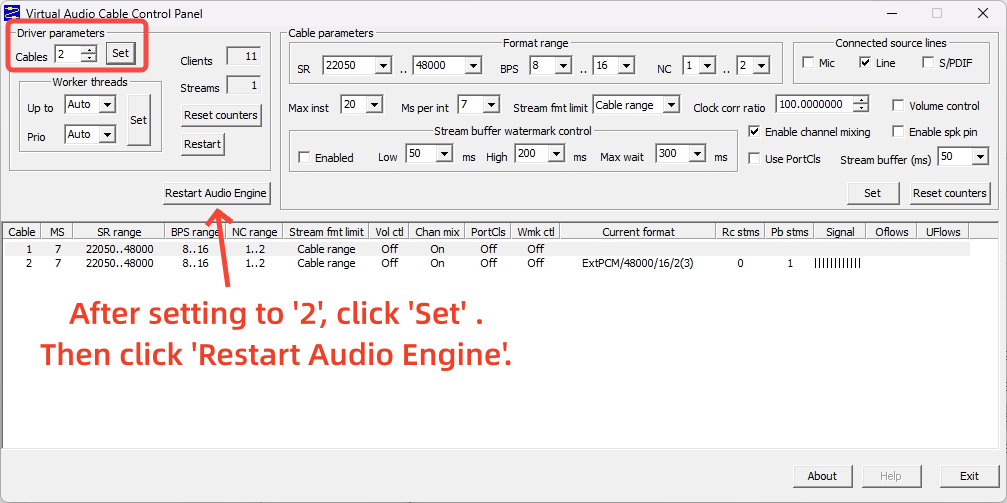
#### 2.7 Modify the driver parameter value to "2" <a href="#id-2.7-modify-the-drive-parameter-value-to-2" id="id-2.7-modify-the-drive-parameter-value-to-2"></a>

Click 'Set' ，then click 'Restart Audio Engine.'

<figure><img src="https://files.gitbook.com/v0/b/gitbook-x-prod.appspot.com/o/spaces%2F9CJd26QKcdOFwMDIr6IB%2Fuploads%2FWeMs59T8UF0hINysIJeL%2F1.5_%E5%89%AF%E6%9C%AC.png?alt=media&#x26;token=fb6fd3b3-93f8-41e1-bd45-4488336a33c5" alt=""><figcaption></figcaption></figure>

#### 2.8 Left-click on the volume icon on the Windows desktop <a href="#id-2.8-left-click-on-the-volume-icon-on-the-windows-desktop" id="id-2.8-left-click-on-the-volume-icon-on-the-windows-desktop"></a>

If it displays as shown in the figure below, the configuration is successful.

<figure><img src="https://2850557763-files.gitbook.io/~/files/v0/b/gitbook-x-prod.appspot.com/o/spaces%2F8zqrLhURHxtqyfjEN6GS%2Fuploads%2FHH6w7027flAYBv3M45J0%2F1.6.png?alt=media&#x26;token=e8a2fc92-cf90-4e89-a221-1853d61dd369" alt=""><figcaption></figcaption></figure>

#### 2.9 Finally, set up Windows services to start automatically <a href="#id-2.9-finally-set-up-windows-services-to-start-automatically" id="id-2.9-finally-set-up-windows-services-to-start-automatically"></a>

Launch the Windows Service application, search for "Services" in the search box, find Windows Audio and Windows Audio Endpoint, right-click on each, open the menu, and set the Startup Type in their properties to "Automatic" (if it is already set to automatic, no action is needed).Node port openings: TCP: 10002, UDP: 10011-10040

<figure><img src="https://2850557763-files.gitbook.io/~/files/v0/b/gitbook-x-prod.appspot.com/o/spaces%2F8zqrLhURHxtqyfjEN6GS%2Fuploads%2FjE7GvswF2uejHaXT6ZQj%2F1.7.png?alt=media&#x26;token=6bc901cf-6e46-461a-b412-d969e1583e94" alt=""><figcaption></figcaption></figure>

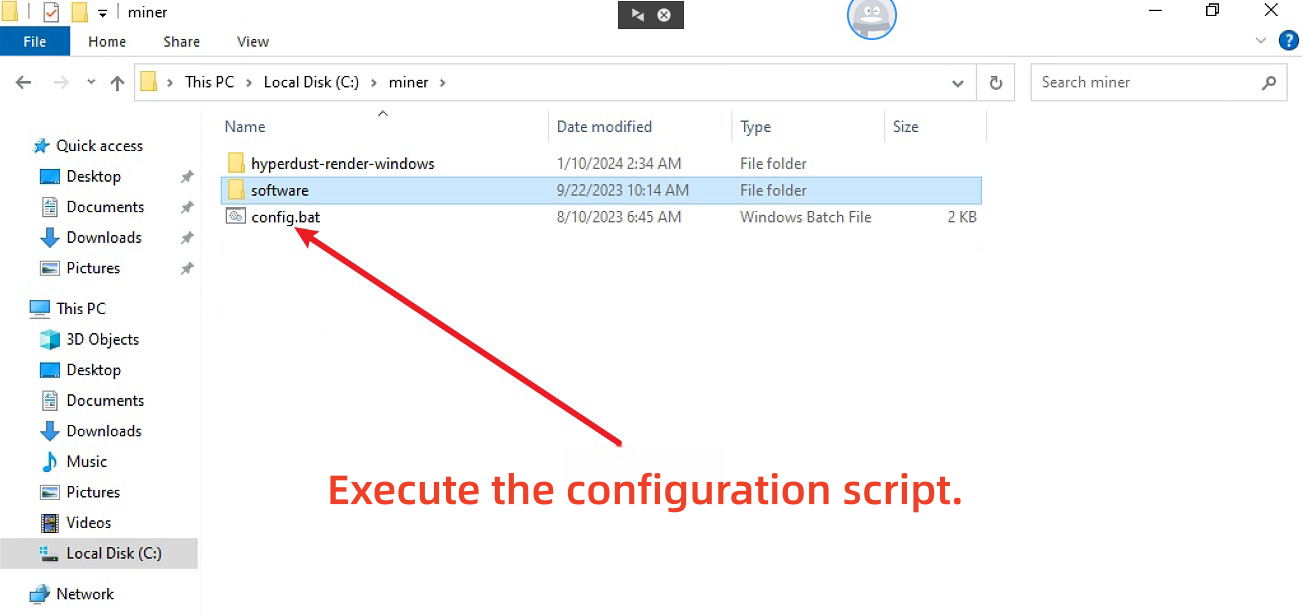
#### 2.10 Run 'miner\config.bat' <a href="#id-2.10-run-config.bat-miner-config.bat" id="id-2.10-run-config.bat-miner-config.bat"></a>

After completing the above steps, run 'miner\config.bat'

​

<figure><img src="https://files.gitbook.com/v0/b/gitbook-x-prod.appspot.com/o/spaces%2F9CJd26QKcdOFwMDIr6IB%2Fuploads%2FVUCbckAVTmI1OSlfI1OD%2F2.10.png?alt=media&#x26;token=0049b32d-f9aa-436d-af62-61e04c965145" alt=""><figcaption></figcaption></figure>

If the control panel displays the following information, it indicates success.

<figure><img src="https://2850557763-files.gitbook.io/~/files/v0/b/gitbook-x-prod.appspot.com/o/spaces%2F8zqrLhURHxtqyfjEN6GS%2Fuploads%2FUo2hWWfDhDqIXD3E9CqX%2F1.8.png?alt=media&#x26;token=71a74740-1aac-4fac-90a2-c3511b8894e4" alt=""><figcaption></figcaption></figure>

#### 2.11 Click "Continue" <a href="#id-2.11-click-continue" id="id-2.11-click-continue"></a>

If the environment check is normal, it indicates successful startup.​

#### \*Proceed to the next step. If the environment check is normal, the startup is succes**sful. If the startup fails, please refer to the 【Guide to Common Issues】 for step-by-step troubleshooting and then restart the service.**


---

# Agent Instructions
This documentation is published with GitBook. GitBook is the documentation platform designed so that both humans and AI agents can read, navigate, and reason over technical content effectively. Learn more at gitbook.com.

## Querying This Documentation
If you need additional information that is not directly available in this page, you can query the documentation dynamically by asking a question.

Perform an HTTP GET request on the current page URL with the `ask` query parameter, and the optional `goal` query parameter:

```
GET https://hyperdust-foundation.gitbook.io/docs-and-guides/run-a-hyperagi-node/2.installing-required-software-for-the-node.md?ask=<question>&goal=<endgoal>
```

`ask` is the immediate question: it should be specific, self-contained, and written in natural language.
`goal` is optional and describes the broader end goal you are ultimately trying to accomplish on behalf of the user. GitBook uses it to tailor the answer towards what is most useful for that goal.

The response will contain a direct answer to the question and relevant excerpts and sources from the documentation.

Use this mechanism when the answer is not explicitly present in the current page, you need clarification or additional context, or you want to retrieve related documentation sections.
