# 3.Deploy Node Modules

### Please place all files in the same directory. <a href="#please-place-all-files-in-the-same-directory" id="please-place-all-files-in-the-same-directory"></a>

​

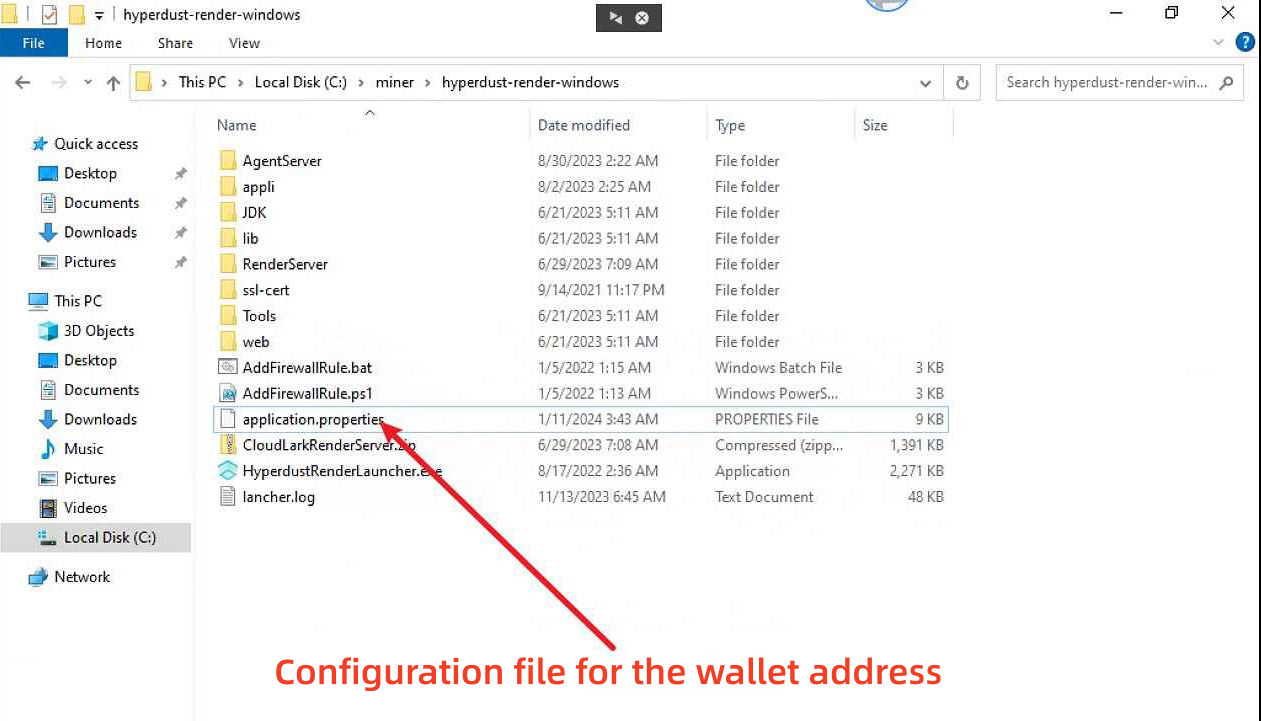
### 3.1 Modify Node Wallet Address (Very Important) <a href="#id-3.1-modify-node-wallet-address-very-important" id="id-3.1-modify-node-wallet-address-very-important"></a>

#### After extracting the hyperdust-render-windows.zip, use Notepad++ (installed earlier) to open the fileminer\hyperdust-render-windows.zip\application.properties (right-click and choose Notepad++).Modify the wallet address in the configuration section at the bottom of the file to your own address and save it.(When modifying this file, please do not run the hyperdustRenderLauncher.exe program. If it is already running, please close the program before opening this file, otherwise, the modification may fail.)

<figure><img src="https://2659394646-files.gitbook.io/~/files/v0/b/gitbook-x-prod.appspot.com/o/spaces%2F9CJd26QKcdOFwMDIr6IB%2Fuploads%2Fo6MnYY1Lzz5Xda6znuRS%2F3.1.png?alt=media&#x26;token=c24e2f1f-f586-47c7-a729-27f610e36648" alt=""><figcaption></figcaption></figure>

<figure><img src="https://2659394646-files.gitbook.io/~/files/v0/b/gitbook-x-prod.appspot.com/o/spaces%2F9CJd26QKcdOFwMDIr6IB%2Fuploads%2FAt4GlCgXtXkJERYDmfmv%2F3.1-1.png?alt=media&#x26;token=78b980c9-317c-495c-a93e-4d798727e782" alt=""><figcaption></figcaption></figure>

#### **\*Note**: **The node wallet address is used to receive $HYPT token rewards for providing computing power. Incorrect configuration may result in significant losses. If you are unsure about this operation, consult with an expert.**

### **3.2 Start the Core Module** <a href="#id-3.2-start-the-core-module" id="id-3.2-start-the-core-module"></a>

#### Double-click on larkXRRenderLauncher.exe to launch the core module. If it fails to start or prompts as a virus, please restart the computer and try again. If it still cannot start, refer to “**Chapter 4: Guide to Common Issues**.”If the display is as shown below, adjust the computer resolution to 1920\*1080 before running larkXRRenderLauncher.exe.

<figure><img src="https://2850557763-files.gitbook.io/~/files/v0/b/gitbook-x-prod.appspot.com/o/spaces%2F8zqrLhURHxtqyfjEN6GS%2Fuploads%2FaRkVVYIJK20Keft8YQom%2F2.3.png?alt=media&#x26;token=51f7fd1e-2688-4699-8fa5-9387a5c4ea55" alt=""><figcaption></figcaption></figure>

<figure><img src="https://2850557763-files.gitbook.io/~/files/v0/b/gitbook-x-prod.appspot.com/o/spaces%2F8zqrLhURHxtqyfjEN6GS%2Fuploads%2FbazTqynvJeLH0TriGNnv%2F2.2.png?alt=media&#x26;token=598ba704-57e7-4e42-8645-9e73f8d7cb4c" alt=""><figcaption></figcaption></figure>

### 3.3 Check the information in the launcher. <a href="#id-3.3-check-the-information-in-the-launcher" id="id-3.3-check-the-information-in-the-launcher"></a>

#### Check whether each item in the environment detection in the launcher has started normally (you can ignore the SteamVR path).You can set whether to automatically start the node service when the computer starts up;（it is recommended to enable automatic startup）.&#x200B;**\*Note: If this icon**![1609118911(1)](https://lh7-us.googleusercontent.com/9wg5h-OnY063VMaImXqCN4ITSeFBKptNtV9aPnGi3ktQoAoYzvlrrWQTsxP8jw6i8YfRSrLYcFVBU0htprAlBvl1i55AAWPlRtSGBfxEUE3hYKXWWfeER2aaoSWs3is3JwgROGUYj2cZORo8_kxal6Gy7Ayh2o2j)**appears when running the executable file, you need to modify the Windows group policy (refer to step 3.4) to enable automatic startup on boot (if you do not need automatic startup on boot, please ignore this step).**&#x200B;

<figure><img src="https://2850557763-files.gitbook.io/~/files/v0/b/gitbook-x-prod.appspot.com/o/spaces%2F8zqrLhURHxtqyfjEN6GS%2Fuploads%2FDlCSIfLbjDE9JeKjtOfx%2F2.4.png?alt=media&#x26;token=478a56d7-431e-4e1d-8bea-28557742c6dc" alt=""><figcaption></figcaption></figure>

### 3.4 Modify Windows Group Policy <a href="#id-3.4-modify-windows-group-policy" id="id-3.4-modify-windows-group-policy"></a>

#### Set "User Account Control: Run all administrators in Admin Approval Mode" and "User Account Control: Admin Approval Mode for the built-in Administrator account" to Disabled in the group policy.The settings are shown in the following figure:

**3.4.1 Simultaneously press 'Win key + R key' to open the 'Run' dialog, then type 'gpedit.msc' and press Enter to open the Local Group Policy Editor.**

<figure><img src="https://2850557763-files.gitbook.io/~/files/v0/b/gitbook-x-prod.appspot.com/o/spaces%2F8zqrLhURHxtqyfjEN6GS%2Fuploads%2FLXaMBn0sTPzATrnGEEa8%2F2.5.png?alt=media&#x26;token=f154bace-fdcb-43d1-a5e1-acfd96df5425" alt=""><figcaption></figcaption></figure>

**3.4.2 Open in sequence: 'Windows Settings' ——'Security Settings' ——'Local Policies' —— 'Security Options'——'User Account Control Admin Approval Mode for the Built-in Administrator account'.**

<figure><img src="https://2850557763-files.gitbook.io/~/files/v0/b/gitbook-x-prod.appspot.com/o/spaces%2F8zqrLhURHxtqyfjEN6GS%2Fuploads%2Foh063lf5S0SRUW0cpxDN%2F2.6.png?alt=media&#x26;token=b3513f3c-26e4-42a8-b4a8-48a389e82516" alt=""><figcaption></figcaption></figure>

**3.4.3 In the Properties window, click 'Disabled'.**

<figure><img src="https://2850557763-files.gitbook.io/~/files/v0/b/gitbook-x-prod.appspot.com/o/spaces%2F8zqrLhURHxtqyfjEN6GS%2Fuploads%2FM06YvP2PRaL2dnVTi2XK%2F2.7.png?alt=media&#x26;token=19cf469c-3e70-4dea-ae4c-20d6bad8e5f6" alt=""><figcaption></figcaption></figure>

#### 3.5 Save Configuration <a href="#id-3.5-save-configuration" id="id-3.5-save-configuration"></a>

Open the configuration manager, make no changes, then click "Save and Restart."

<figure><img src="https://2850557763-files.gitbook.io/~/files/v0/b/gitbook-x-prod.appspot.com/o/spaces%2F8zqrLhURHxtqyfjEN6GS%2Fuploads%2FzcEMKPpzPAPF2AbCy9yD%2F2.8.png?alt=media&#x26;token=01e7fefd-b93d-4358-8045-8ee2943bfa9c" alt=""><figcaption></figcaption></figure>

#### 3.6 Confirm Startup Status <a href="#id-3.6-confirm-startup-status" id="id-3.6-confirm-startup-status"></a>

If it appears as shown in the following figure, the startup status is successful.**\*Note: Each node needs to be assigned a specific public IP; otherwise, it may result in startup failure.**

<figure><img src="https://2850557763-files.gitbook.io/~/files/v0/b/gitbook-x-prod.appspot.com/o/spaces%2F8zqrLhURHxtqyfjEN6GS%2Fuploads%2FWRK44GbUMrxq2p23IHJc%2F2.9.png?alt=media&#x26;token=c7c6f7ed-a2cc-4ce1-b274-619560c20429" alt=""><figcaption></figcaption></figure>

### 3.7 Registering the node on the blockchain. <a href="#id-3.7-rendering-application-setup" id="id-3.7-rendering-application-setup"></a>

#### Before registering, please ensure that the latest version of the graphics card driver is installed.

#### Log in to <https://www.app.hyperdust.io/>, enter the personal center, and  log in using the node wallet address from step 3.1.

<figure><img src="https://2659394646-files.gitbook.io/~/files/v0/b/gitbook-x-prod.appspot.com/o/spaces%2F9CJd26QKcdOFwMDIr6IB%2Fuploads%2FZj0QmAVefyvkAh7lfG6d%2F3.8.png?alt=media&#x26;token=54a721d2-81a8-4264-93b7-dc1baedfdd80" alt=""><figcaption></figcaption></figure>

#### Go to Miner Manage - Hyper Node, click 'Active' to activate the node and start working.

<figure><img src="https://2659394646-files.gitbook.io/~/files/v0/b/gitbook-x-prod.appspot.com/o/spaces%2F9CJd26QKcdOFwMDIr6IB%2Fuploads%2FjMdUwPsTLF5GMev8uwSU%2F3.8-1.png?alt=media&#x26;token=cff81a2f-6c80-40d6-a073-270032ab135b" alt=""><figcaption></figcaption></figure>

<figure><img src="https://2659394646-files.gitbook.io/~/files/v0/b/gitbook-x-prod.appspot.com/o/spaces%2F9CJd26QKcdOFwMDIr6IB%2Fuploads%2FjAPbdcB44NYow5SnU3Mf%2F%E5%BE%AE%E4%BF%A1%E5%9B%BE%E7%89%87_20240205175511.png?alt=media&#x26;token=3fd0f0a2-c68c-4fb1-b7a9-ce729aef471e" alt=""><figcaption></figcaption></figure>

<figure><img src="https://2659394646-files.gitbook.io/~/files/v0/b/gitbook-x-prod.appspot.com/o/spaces%2F9CJd26QKcdOFwMDIr6IB%2Fuploads%2F1E2lzuKUB3neBzzUQvk2%2F3.8-2.png?alt=media&#x26;token=ad50691b-a3ca-4d38-bb15-e52188afc7ca" alt=""><figcaption></figcaption></figure>
